Homemade Cinnamon Crumb Buns: The Ultimate Guide to Crispy Crumb & Fluffy Dough
Imagine waking up to the irresistible aroma of freshly baked goods wafting through your home. That's the magic of
soft & buttery cinnamon crumb buns for breakfast, a true bakery classic that instantly transforms an ordinary morning into something extraordinary. These aren't just any buns; we're talking about homemade cinnamon crumb buns, famed for their pillowy, tender dough and an incredibly generous, crispy, buttery crumb topping. Forget the bland, store-bought versions; the journey to crafting these warm, comforting delights from scratch is deeply rewarding, promising an indulgence that truly nourishes the soul.
Originating from bakeries in regions like New York and New Jersey, these crumb-laden beauties hold a special place in the hearts of many. For those who grew up savoring Sunday morning crumb buns from their local bakery, the taste evokes powerful nostalgia. While coffee cakes offer a similar crumb experience, there's a unique satisfaction in a true yeast-based bun – a nuanced chewiness and delicate rise that a cake simply can't replicate. The quest for that perfect balance of a fluffy interior and a robust, crispy exterior leads us to this comprehensive guide, ensuring every bite is a delightful echo of cherished memories.
The Allure of Homemade Cinnamon Crumb Buns
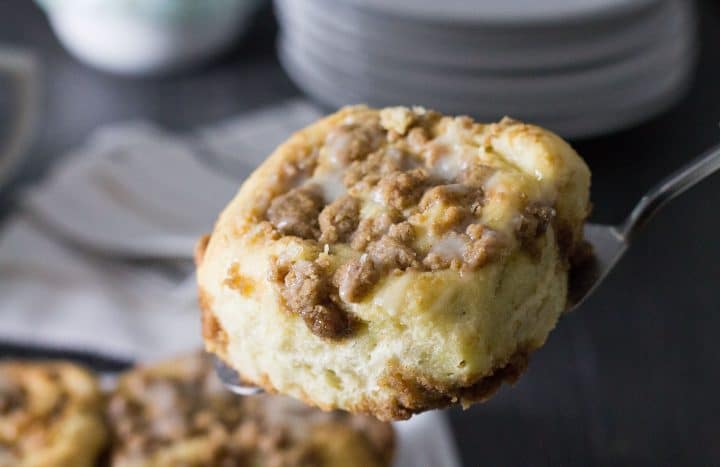
What makes a homemade cinnamon crumb bun so utterly captivating? It’s the harmonious marriage of textures and flavors. On one hand, you have a rich, sweet yeast dough, expertly kneaded and risen to achieve an ethereal lightness. This dough, often subtly spiced, provides the perfect canvas. On the other, and perhaps the star of the show, is the crumb. Unlike a mere dusting, a proper cinnamon crumb bun boasts a substantial, buttery streusel that’s crumbly, golden, and deeply flavored with cinnamon. When baked, parts of it become wonderfully crisp, offering a delightful contrast to the soft bun beneath.
The true genius often lies in a "double-stuffed" approach – not only generously topping the buns with crumb, but also incorporating a layer of that spiced crumb *within* the rolled dough. This ensures a burst of cinnamon-sugar goodness in every spiral. While some prefer a simple dusting of powdered sugar, others crave a sweet glaze drizzled over the warm buns. The beauty of baking at home is that you dictate the final flourish, tailoring it to your preference. Whether enjoyed hot from the oven with a morning coffee or as an afternoon treat, these buns promise warmth, comfort, and an unforgettable taste. For an even deeper dive into regional variations, consider exploring an
Authentic New Jersey Cinnamon Crumb Buns Recipe.
Crafting the Perfect Fluffy Dough: A Baker's Secret
The foundation of any exceptional crumb bun is a perfectly executed yeast dough. This isn't just about mixing ingredients; it's about understanding the science and art behind baking. A good yeast dough yields buns that are tender, airy, and moist, providing the ideal counterpoint to the crumb topping.
Mastering the Rise
Yeast is a living organism, and its activity is crucial for the dough's texture. For your buns to achieve that sought-after fluffiness, ensure your yeast is active. Lukewarm liquid (around 105-115°F or 40-46°C) is key – too hot, and it kills the yeast; too cold, and it won't activate properly. Give your dough ample time to rise in a warm, draft-free environment. The first rise, often until doubled in size, develops flavor and structure. The second rise, after the buns are shaped and placed in the pan, is equally vital for that final airy lift during baking. Don't rush it; patience is a baker's best friend.
Kneading Your Way to Perfection
Kneading develops the gluten in the flour, which gives the dough its elasticity and structure. Whether by hand or with a stand mixer, aim for a dough that is smooth, elastic, and pulls away cleanly from the sides of the bowl. This could take anywhere from 8-10 minutes with a mixer or 10-15 minutes by hand. A well-kneaded dough will stretch without tearing easily, indicating proper gluten development. This elasticity is what allows the dough to capture the gases produced by the yeast, resulting in those wonderful air pockets and a light texture. Resist the urge to add too much extra flour during kneading; a slightly sticky dough is often a sign of good hydration.
The Irresistible Crispy Crumb: More Than Just a Topping
While the fluffy dough forms the heart of these buns, the crumb is undeniably its soul. The ideal crumb should be generous, deeply buttery, and speckled with cinnamon, offering a satisfying crispness that contrasts beautifully with the soft dough. Achieving this balance requires attention to proportions and technique.
Inside & Out: The Double Crumb Delight
One of the secrets to truly sensational cinnamon crumb buns is the "double-stuffed" method. This means incorporating a portion of your delicious crumb mixture not only on top of the buns but also rolled *into* the dough itself. After rolling out your risen dough into a rectangle, spread a thin layer of melted butter, then evenly sprinkle half of your prepared crumb mixture over it. This internal layer melts and melds with the dough as it bakes, infusing every swirl with an extra burst of cinnamon-sugar flavor and a subtle textural interest. The remaining crumb is then generously scattered over the shaped buns just before their second rise, ensuring a thick, golden, and ultimately crispy topping.
Achieving the Ideal Crumb Texture
The perfect crumb starts with the right ingredients and ratios: typically flour, sugar (often a mix of granulated and brown for depth), ground cinnamon, and cold butter. Using cold butter is crucial, as it creates pockets of steam during baking, contributing to that desired crispness. Work the butter into the dry ingredients using your fingertips, a pastry blender, or even a food processor, until the mixture resembles coarse crumbs with some larger, pea-sized pieces. Avoid overworking, which can melt the butter and lead to a paste rather than distinct crumbs. For an even crisper texture, some bakers like to add a pinch of salt to balance the sweetness and a touch of nutmeg for an extra layer of warmth.
Step-by-Step Guide to Your Best Batch Yet
Let's walk through the process of creating these heavenly homemade cinnamon crumb buns, from mixing to serving.
From Dough to Delight: The Rolling and Filling
Once your dough has completed its first rise and doubled in size, gently punch it down to release the air. Turn it out onto a lightly floured surface and roll it into a large rectangle, typically around 15 by 9 inches. This size is ideal for creating enough spirals for 10-12 generous buns. Evenly spread a thin layer of melted butter over the entire surface of the rolled dough. Then, sprinkle half of your prepared crumb mixture over the butter, ensuring an even distribution right to the edges. Beginning from the 15-inch side, carefully roll the dough into a tight log. Pinch the seam firmly to seal it, preventing the filling from escaping during baking. Use a sharp knife or even unflavored dental floss to cut the log into 10-12 uniform slices. This ensures even baking.
The Second Rise and Golden Bake
Prepare your baking pan (a 13x9 inch pan is ideal) by coating the bottom with melted butter. Arrange your sliced buns in the pan, leaving at least an inch of space between each. This allows them room to expand during their final rise and baking. Brush the tops of the buns with a little more melted butter, then generously sprinkle the remaining crumb mixture over and between them. This second layer of crumb is what forms the glorious crispy topping. Now, cover the pan lightly and let the buns rise again for about 45 minutes to an hour, or until they have visibly doubled in size. During this time, preheat your oven to 350°F (175°C). Bake the buns for 25-30 minutes, or until they are golden brown on top and the crumb is delightfully crisp.
Finishing Touches: Toppings & Serving
As soon as the buns emerge from the oven, your kitchen will be filled with an intoxicating aroma. While still warm, you have a choice for the final touch. A simple dusting of powdered sugar is a classic, allowing the natural flavors of the cinnamon and buttery crumb to shine. However, if you prefer a sweeter, gooier experience, prepare a simple glaze by whisking powdered sugar with a little milk or cream and a splash of vanilla extract. Drizzle this generously over the warm buns. The glaze will set slightly, creating a beautiful finish. These buns are truly best enjoyed fresh and warm – that's when the dough is at its softest and the crumb at its crispiest. While they are delicious leftover, that initial warmth and texture is unparalleled. So dive in and savor every single bite!
Tips for Success and Variations
Baking is an art, but also a science, and a few insider tips can elevate your cinnamon crumb buns from good to absolutely phenomenal.
Common Pitfalls and How to Avoid Them
*
Dry Buns: This is often due to overbaking or using too much flour during kneading. Ensure you bake until just golden, and measure flour precisely.
*
Soggy Crumb: If your crumb isn't crisp, it might be too thin, or the butter might have melted before baking. Use cold butter, and ensure a generous, thick layer of crumb on top.
*
Buns Sticking: Always grease your pan thoroughly with melted butter. Parchment paper can also be used for easy removal.
*
Uneven Rise: Make sure your yeast is fresh and your rising environment is consistently warm and draft-free.
Elevating Your Crumb Buns: Flavorful Twists
While classic cinnamon is divine, don't be afraid to experiment:
*
Spice it Up: Add a pinch of nutmeg, cardamom, or allspice to your crumb mixture for a more complex flavor profile. A tiny bit of orange zest in the dough or glaze can also brighten the overall taste.
*
Nutty Crumb: Fold in finely chopped pecans or walnuts into your crumb mixture for added crunch and flavor.
*
Cream Cheese Glaze: For an extra decadent finish, opt for a cream cheese frosting instead of a simple powdered sugar glaze.
*
Make Ahead Option: While best fresh, you can prepare the dough the night before and let it do its first rise slowly in the refrigerator overnight. Punch down, shape, and let it come to room temperature for the second rise in the morning before baking.
There's an undeniable joy in the entire process of baking homemade cinnamon crumb buns – from the tactile pleasure of kneading the dough to the intoxicating aromas that fill your home, and finally, the sheer bliss of that first warm bite. These buns are more than just a recipe; they are an experience, a nostalgic journey, and a comforting embrace in edible form. So gather your ingredients, clear your schedule, and treat yourself and your loved ones to the unparalleled delight of crispy crumb and fluffy dough. You’ll be glad you did.